 Save to Pinterest
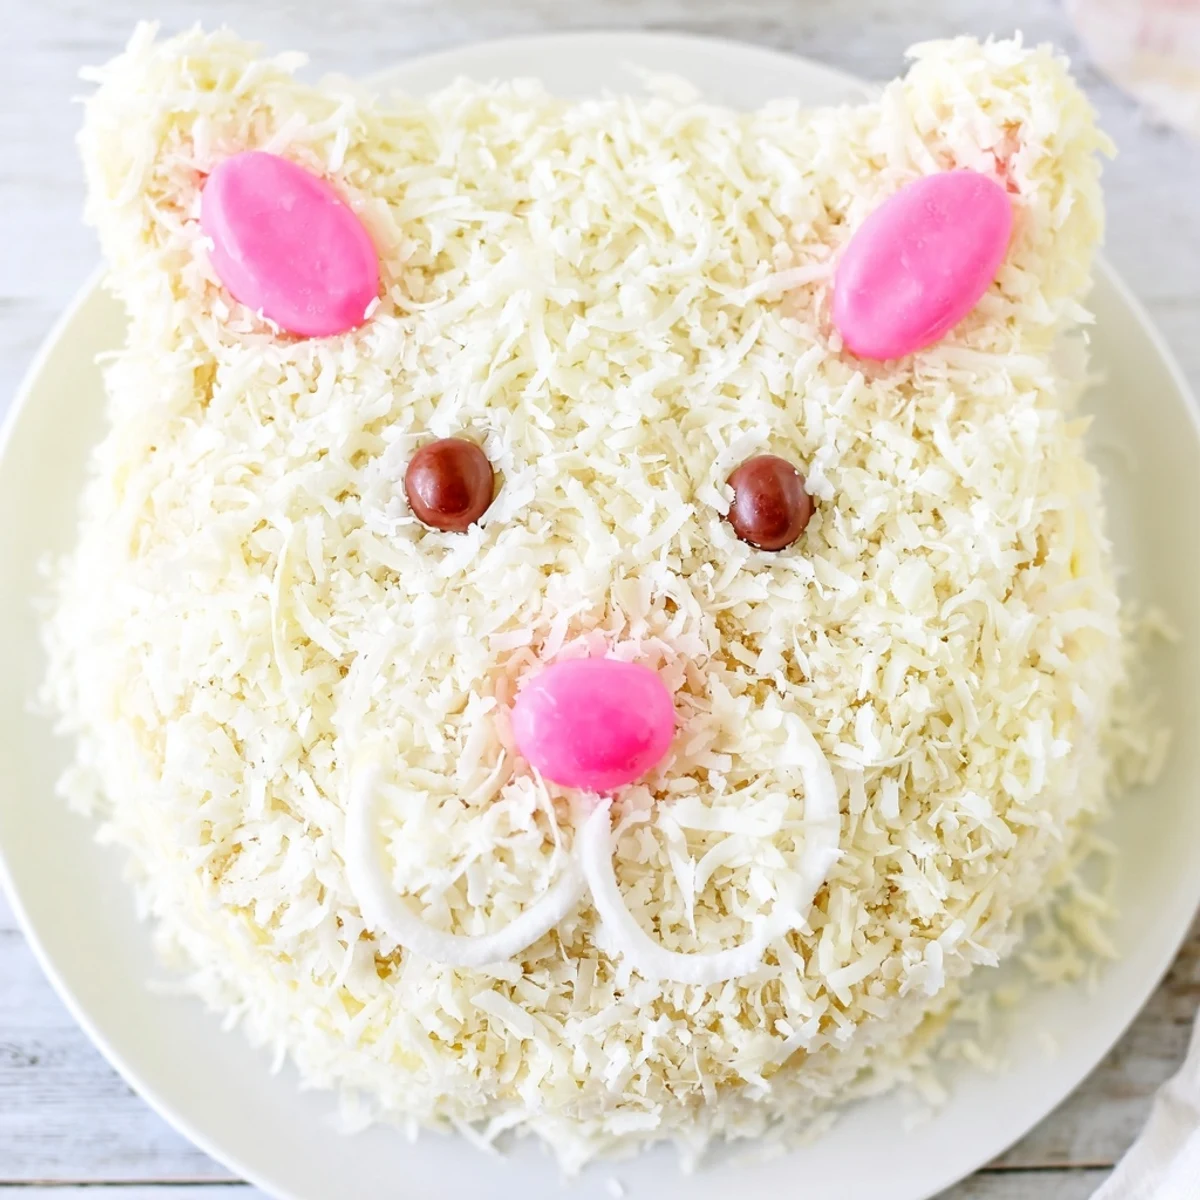
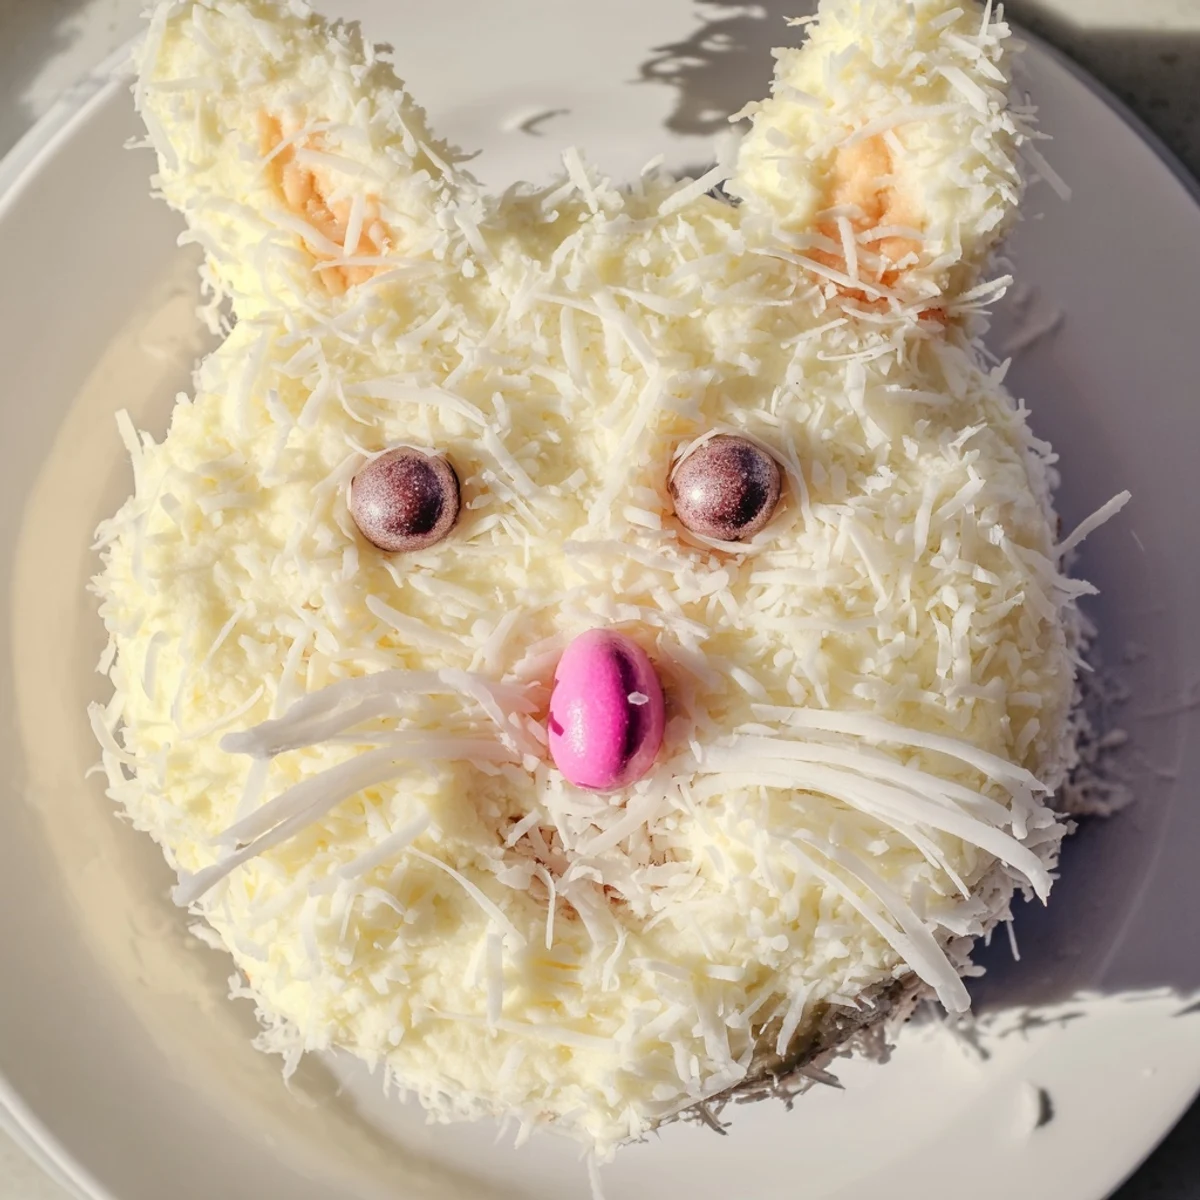
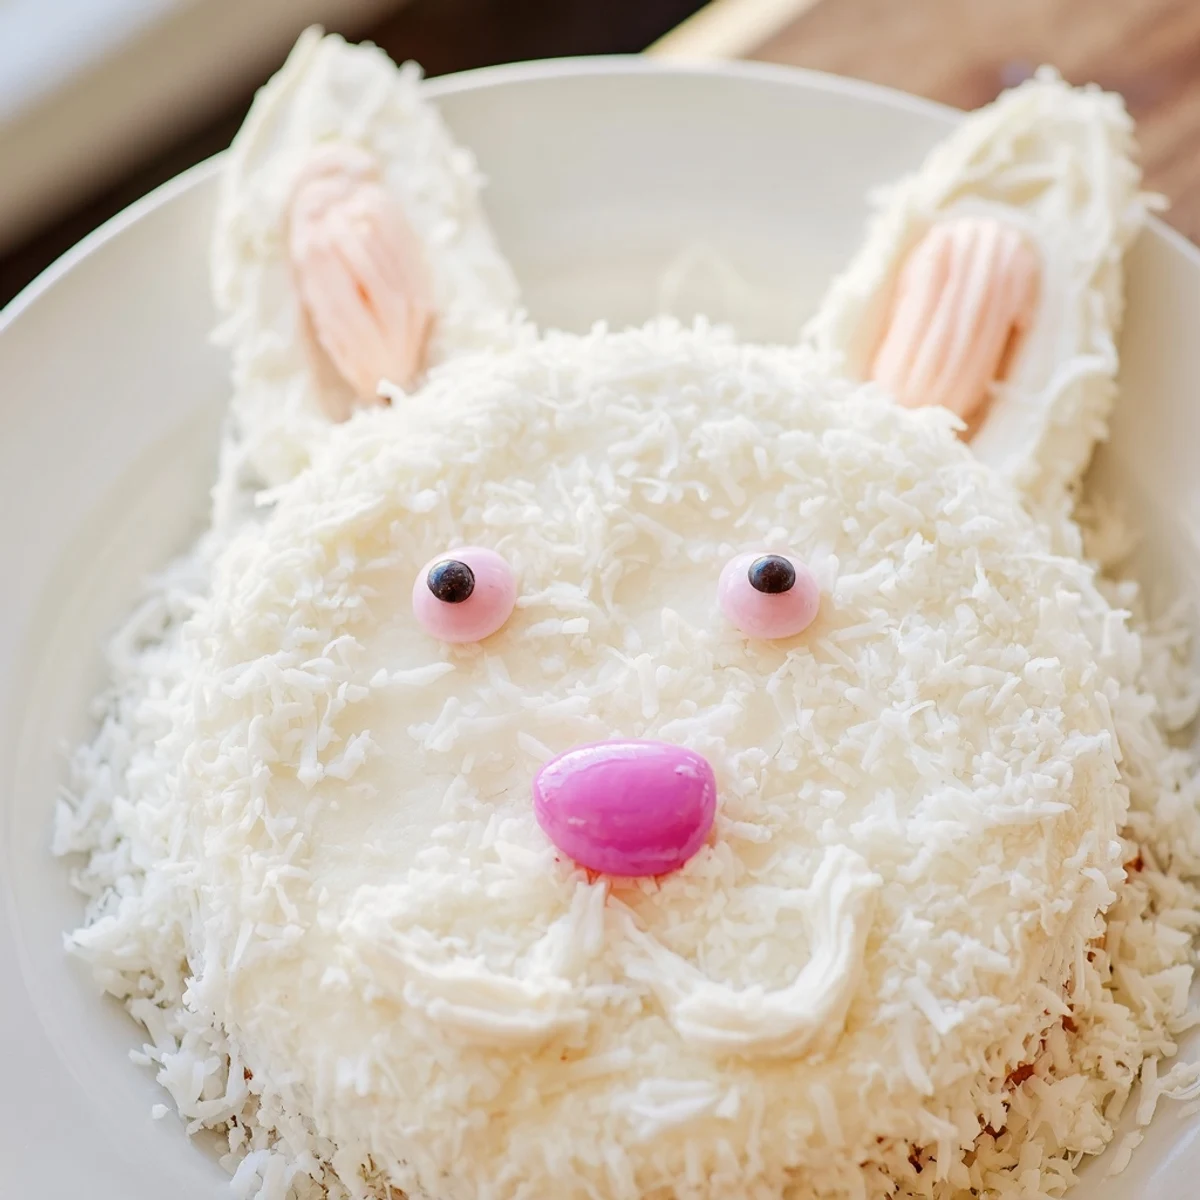
 This charming bunny-shaped dessert brings whimsy to your Easter table. Moist vanilla layers form the face and pointed ears, all covered in creamy buttercream and fluffy coconut for realistic fur. The assembly is straightforward—bake two round cakes, then cut one into ear shapes while keeping the other whole for the face. A crumb coat ensures clean frosting, while pink-tinted coconut adds sweet detail to inner ears. Finish with candy eyes, a jellybean nose, and fondant accents. The result is an adorable centerpiece that tastes as delightful as it looks.
The first time I attempted this bunny cake, my kitchen looked like a coconut explosion. There were white flakes in my hair, on the counter, even on the dog who had wandered in hoping for dropped treats. But when I carried that goofy, grinning cake to the table and saw the adults light up like little kids, I knew every sticky moment had been worth it.
My niece helped me decorate the version we made last Easter, and she insisted our bunny needed three eyes because she wanted him to see extra well. We laughed until our sides hurt, and honestly, that lopsided, overly enthusiastic cake became the most memorable dessert we have ever served.
Ingredients
- All-purpose flour: The protein structure here keeps your cake tender but sturdy enough to withstand all that cutting and rearranging
- Baking powder and soda: This dynamic duo ensures your cake rises beautifully and has a fine, even crumb that slices cleanly
- Unsalted butter: Room temperature butter is nonnegotiable for proper aeration, and controlling the salt yourself lets you fine tune the final flavor
- Granulated sugar: Creaming this with the butter creates tiny air pockets that make your cake light and tender
- Large eggs: These bind everything together while adding richness and structure to the crumb
- Whole milk: The fat content here keeps your cake moist and gives it a velvety texture
- Vanilla extract: Do not skimp here because pure vanilla is the backbone of that classic birthday cake flavor everyone loves
- Powdered sugar: Sifting this first prevents lumps in your frosting that would mar that smooth, professional finish
- Shredded sweetened coconut: This creates that adorable fur texture while adding subtle sweetness and chew
- Pink food coloring: A tiny drop goes an incredibly long way, so start with less than you think you need
- Jelly beans or mini candies: These bring your bunny to life, so choose colors that make you smile every time you look at the cake
Instructions
- Preheat your oven and prep those pans:
- Getting your oven to 350°F and thoroughly greasing and flouring two 8 inch round pans means your cakes will release beautifully every single time
- Whisk together your dry ingredients:
- Combine the flour, baking powder, baking soda, and salt in a medium bowl so they are evenly distributed before they meet the wet ingredients
- Cream butter and sugar until pale and fluffy:
- This usually takes about 3 to 5 minutes and is worth every second because it creates the airy texture that makes a cake truly exceptional
- Add eggs one at a time:
- Beating in each egg completely before adding the next ensures proper emulsification and prevents your batter from curdling
- Alternate flour and milk:
- Start and end with the flour mixture, mixing only until just combined to prevent developing too much gluten which would make your cake tough
- Bake until perfectly done:
- 22 to 25 minutes should do it, but trust your toothpick test more than the timer because every oven has its own personality
- Cool completely before proceeding:
- Warm cake will melt your frosting and slide apart, so patience here saves you from a structural disaster later
- Make that silky buttercream:
- Beat the butter smooth first, then gradually add powdered sugar while your mixer runs on low to prevent a sugar snowstorm in your kitchen
- Transform rounds into bunny parts:
- Keep one cake whole for that adorable face, cut the second into two long ovals for ears, and shape the remaining center into a bow tie that makes the whole presentation
- Arrange your bunny on the serving tray:
- Play with the positioning until the face, ears, and bow tie look proportional and appealing from the angle where guests will be sitting
- Apply a crumb coat and chill:
- This thin layer of frosting locks in loose crumbs and creates a smooth base for your final coat, and 20 minutes in the fridge sets it perfectly
- Frost fully and add coconut fur:
- Work quickly but gently, pressing handfuls of coconut onto the frosted surface until every bit of buttercream is hidden under that fluffy white coat
- Add pink details to the inner ears:
- Use a tiny drop of food coloring mixed with a small handful of coconut, then pat it carefully onto the ear centers for that realistic depth
- Give your bunny some personality:
- Place fondant or marshmallow ears, then add candy eyes and a nose, stepping back occasionally to make sure his expression is as cute as you imagined
 Save to Pinterest
 Last spring my neighbor accidentally used red food coloring instead of pink, and her bunny ended up looking aggressively sunburned. We still laugh about it every time we see coconut, and honestly, that slightly alarming dessert tasted just as wonderful as the picture perfect ones.
Making It Ahead
You can bake the cake layers up to two days in advance, wrap them tightly in plastic, and store them at room temperature. The frosting can also be made ahead and kept refrigerated, but let it come to room temperature and give it a quick whip before using.
Shaping Without Stress
If the thought of cutting those ears makes you nervous, sketch the shapes on parchment paper first and use it as a guide. Remember that the coconut covering hides rough edges, so perfect cuts are not necessary for an adorable result.
Serving And Storage
This cake is best served the same day it is decorated because the coconut can absorb moisture from the frosting over time. If you must store it, keep it in a cake dome at room temperature rather than the refrigerator.
- Bring the cake to room temperature before serving if it has been refrigerated
- Use a sharp serrated knife to cut clean slices that show off the layers
- Leftovers rarely last long, but any remaining cake stays fresh for 2 days covered
 Save to Pinterest
 There is something magical about watching grown adults grin at a dessert shaped like a rabbit, and this cake delivers that joy every single time.
Recipe FAQs
- → How far in advance can I make this bunny cake?
-
Prepare the cake layers up to 2 days ahead, wrapped tightly in plastic. Complete assembly and decoration the day of serving for the freshest appearance. The fully decorated cake stays moist at room temperature for 2 days or refrigerated for 4 days.
- → What's the best way to cut the cake into bunny shapes?
-
Use a serrated knife for clean cuts. Leave one 8-inch round whole for the face. Cut the second round in half, then trim each half into long ovals for ears. The remaining center piece becomes a bow tie when cut into a triangle or diamond shape.
- → Can I use chocolate cake instead of vanilla?
-
Absolutely. Chocolate cake pairs beautifully with coconut and works well for this design. The coconut fur creates lovely contrast against dark layers. Keep the same frosting and decoration method.
- → How do I get the coconut to stick properly?
-
Apply the final layer of buttercream while still slightly tacky, not chilled. Gently press handfuls of coconut onto the frosted surface, working in sections. Let gravity help by patting coconut onto the sides first, then the top.
- → What alternatives work for the bunny ears?
-
Pink and white fondant creates smooth, durable ears. Large marshmallows sliced in half diagonally make quick, soft ears. For a structural option, use cardboard or fondant-covered wire supports inside the cake pieces.
- → Is this cake suitable for beginners?
-
The vanilla cake batter is simple and forgiving. The shaping requires basic knife skills but no intricate carving. Most decorations use readily available candies. Total hands-on time is about an hour, making it accessible for home bakers.